Pixii can make your product look amazing. It can also wreck it. Most of the time, the difference isn’t the AI. It’s the photo you upload.
Here’s the rule that explains almost every bad output we see on demo calls:
“AI has 30 seconds and it’s got to do two jobs. One, understand the product. Two, design something beautiful. If it burns the 30 seconds figuring out what the product is, there’s no time left for beautiful.”
Monte Desai, Founder of Pixii
Bad input photos eat the 30 seconds. Good ones leave room for the design.
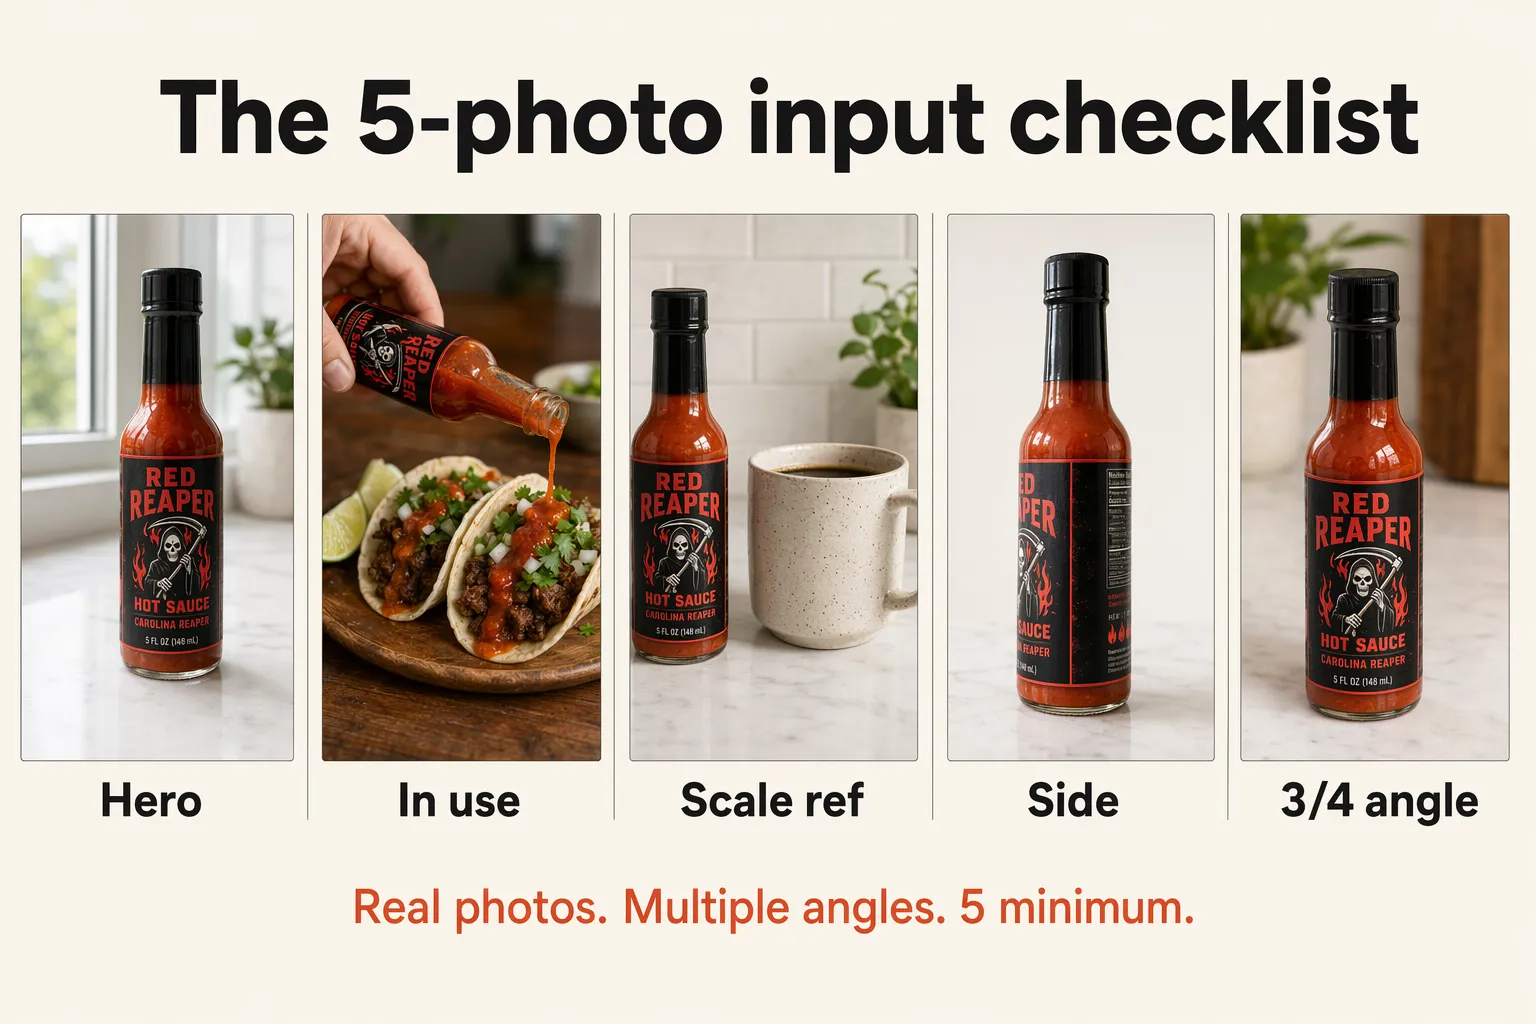
The 5-photo input checklist
What Pixii needs to do its best work:
- ✅ At least 5 photos of the same product, so AI can build a real mental model
- ✅ Real photos, not renders, straight from your phone or camera
- ✅ One hero shot + one in-use shot, label visible, then the product being held, poured, applied, or worn
- ✅ One with a household object for scale, a coffee mug, a hand, a US quarter, a Coke can
- ✅ Multiple angles, straight-on, side profile, 3/4
Why bad input wrecks the output
Most product photos are already damaged before AI ever sees them.
Amazon, WhatsApp, and Slack compress photos. A 10 MB original from your camera becomes a 100 KB thumbnail on your listing. That’s 1,000x less data for the AI to work with. The label gets soft, the edges blur, the colors flatten. We can’t see the difference. AI does.
Renders are a different problem. Renders are perfect. No real shadows, no surface micro-imperfections, no lens artifacts, no dust. The smoothness is the problem. AI looks for those imperfections to anchor reality, and when they’re missing, it invents physics that don’t exist.
Background-removed cutouts strip out depth cues. AI can’t place a floating product into a real-looking room because there’s no light, no shadow, and no ground plane to copy from.
“AI can’t know your product if you don’t explain it. The photo IS the explanation.”
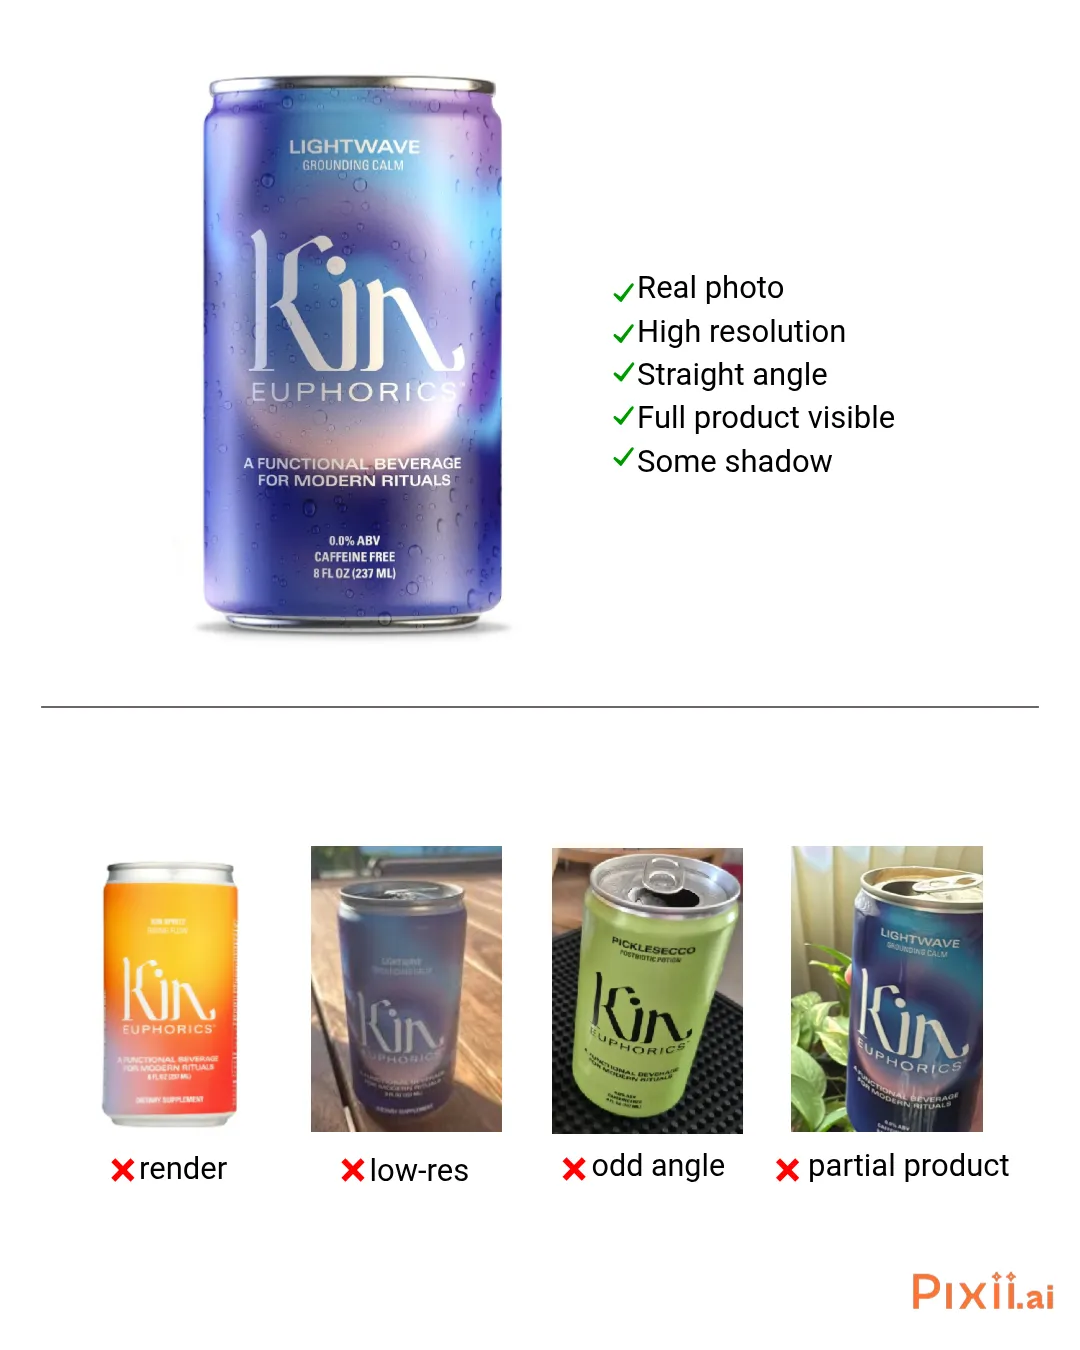
See the difference
Same product. Same AI. The only thing that changed was the input photo.
Left: product is different in every shot. The creative is not very creative either, because AI is busy guessing what the product is.
Right: consistent product in every shot, better writing, and better creative.
What each checklist item means
5 photos of the same product
One photo is a guess. 5 is a picture. AI builds its mental model from multiple views, and each extra angle cuts down on the invention. Storage is free, take more than you think you need.
Real photos, not renders
This is the single biggest unlock. Renders convert well on Amazon main images, that’s why so many brands run them. But if you want lifestyle, A+ modules, ads, or anything that needs to look real, renders work against you.
“The input is a render, so the output is always going to be a render. AI sees no shadows, no reflections, no texture, and it just assumes the product is super shiny and plastic. So your lifestyle shot is also shiny and plastic. You can never get a natural lifestyle shot from a render.”
A render is perfect on purpose. All the smoothness has been removed. But that smoothness is exactly what AI uses to figure out the real world. Counterintuitive but true: the imperfections in a real photo, the wrinkles, the smudge, the slight blur, the dust on the label, are what make AI outputs look believable.
If your supplier only gave you renders, you have three options. Take a real photo with your phone (it takes 5 minutes and will save you hours of editing later). Use the render but accept the tradeoff (great for main images, weak for lifestyle). Or upload the flat die-line label alongside the render so AI can read the text clearly.
One hero shot + one in-use shot
The hero is your front-facing main image. Full label visible, clean lighting, eye level. This tells AI what the product IS.
The in-use shot is the one most sellers forget. Product being poured, held, applied, worn, sat on, opened. This is what unlocks natural lifestyle output. Without an in-use shot, AI doesn’t know how the product is touched and held, so the lifestyle scenes end up looking like the product was Photoshopped into the room.
One with a household object for scale
Drop a coffee mug, a hand, a US quarter, or an iPhone next to the product. This is the only way AI knows how big your product actually is. Without it, your 4 oz bottle can end up the size of a building in some lifestyle scenes, or a 20 lb hardware set can shrink to look like a keychain.
Multiple angles
Straight-on, side profile, 3/4. Each angle gives AI more shape information. The more it knows about your product, the less it has to invent. For products with depth (boxes, bottles, hardware, packaging with a back side), this matters even more.
What to avoid
- ❌ Renders and mockups, shiny in, shiny out. See above.
- ❌ Low-res or compressed photos, if it came from Amazon, WhatsApp, or Slack, it’s been squeezed. Find the original on your computer.
- ❌ Odd angles, shoot straight-on at eye level. Top-down and tilted angles force AI to guess what the front of your product looks like.
- ❌ Partial products, if the top of the bottle is cut off, AI invents what goes there. Frame the entire product with margin around the edges.
Your 3 options
1. Pick a better photo
You probably already have a good one. Dig through your camera roll or product shoot folder and find the sharpest, clearest shot. Full label in frame, nothing cut off, even lighting. One sharp photo beats 10 mediocre ones.
2. Take a better photo
You don’t need a studio. Your phone is enough. Good lighting, a clean background, and a straight-on angle gets you most of the way there. Use a 3-second timer so the phone doesn’t shake when you tap the shutter.
Full guide: Take product photos like a pro with just your phone →
3. Tweak what you have
Sometimes the photo is almost there. Erase blurry text and retype it cleanly, clone out a fingerprint, bump the contrast so the label reads clean, crop tight around the product. You’re not retouching, you’re giving AI a cleaner starting point. Pixii has Spot Edit for this.
Bottom line
Better input, better output. Better ingredients, better pizza. Good input, good output. Garbage in, garbage out. Pick whichever line you like. The rule is the same: AI builds on what you feed it.
Start with a real, high-res photo. Run through the 5-photo checklist before you upload. Pixii turns it into lifestyle shots, A+ modules, infographics, ads, and web pages.
FAQ
What if my product is unique or one-of-a-kind?
AI does great with familiar categories. Supplement bottles, soda cans, shampoo, snack bags, hot sauce. AI has seen a million of those and knows the shape, the proportions, the textures, the way light falls on them. For those products, even one photo can be enough.
But if your product is genuinely unique, hardware that no one else makes, a niche kitchen tool, a packaging shape AI has never seen, you’re in what we call “out of distribution.” AI has to invent more, so it makes more mistakes.
The fix is more input. More angles, more close-ups of the label, more in-use shots, more context. The more you show AI, the less it has to guess.
Why does the input photo matter so much?
Because the photo IS how AI learns your product. It can’t read your spec sheet, your patent filing, or your brand book. It sees pixels, and it builds from there.
Better pixels, better result. We’ve seen sellers cut their editing time by 80% just by uploading high-res real photos instead of compressed Amazon-pulled ones.
My supplier only gave me 3D renders. Can I still use Pixii?
Yes, but know the tradeoff. Renders are fine for Amazon main images, in fact they often convert better than real photos for the hero slot. That’s why a lot of brands use them.
For lifestyle scenes, A+ content, ads, or anything that needs to feel like a real photograph, renders work against you. The output will inherit that render-perfect look, shiny and plastic. The product ends up looking pasted in.
If your packaging isn’t manufactured yet, your best bet is to order a single sample, take a phone shot of it on a counter near a window, and use that as your lifestyle input. The render can stay as your main image.
Do I need a professional camera or a studio?
No. A phone shot near a window beats most studio shots for AI input. Studio photos are often so heavily retouched that all the real-world information has been removed. AI prefers honest pixels with shadows and texture.
Get a $9 mini tripod from Amazon, prop your phone near a window, use a 3-second timer so the phone doesn’t shake, and shoot directly on the counter. See the phone photo guide for the full setup.
How many photos is enough?
5 minimum. See the checklist at the top of this article. More is better. Storage is free, so take more than you think you need and pick the sharpest ones. You can also pull additional reference photos from your customer reviews if you don’t have your own.
What if my main image looks great but my lifestyle scenes are off?
Almost always a render-vs-real input issue. Your main image probably uses a render (clean, label-perfect) and Pixii is doing fine with it. But the lifestyle scenes are inheriting that render look, so the product ends up looking pasted in.
The fix: upload a real photo as well. Even a quick phone shot of the product on a kitchen counter, plus the original render, gives Pixii both inputs to work from. Real for lifestyle, render for main.
Related
💡 Which photo works best with Pixii AI