Why your iPhone beats your Amazon listing photos
A raw iPhone photo is around 10 MB. The image on your Amazon listing is around 100 KB. That’s roughly 100x more visual information for AI to work with. More detail, sharper edges, better color, real texture, real shadows.
Renders look polished but they lack the imperfections, real shadows, and lens cues that make AI-generated content believable. When you feed Pixii a render, the output ends up looking like a render too. Shiny, plastic, pasted in. Real photos beat renders every time for lifestyle scenes.
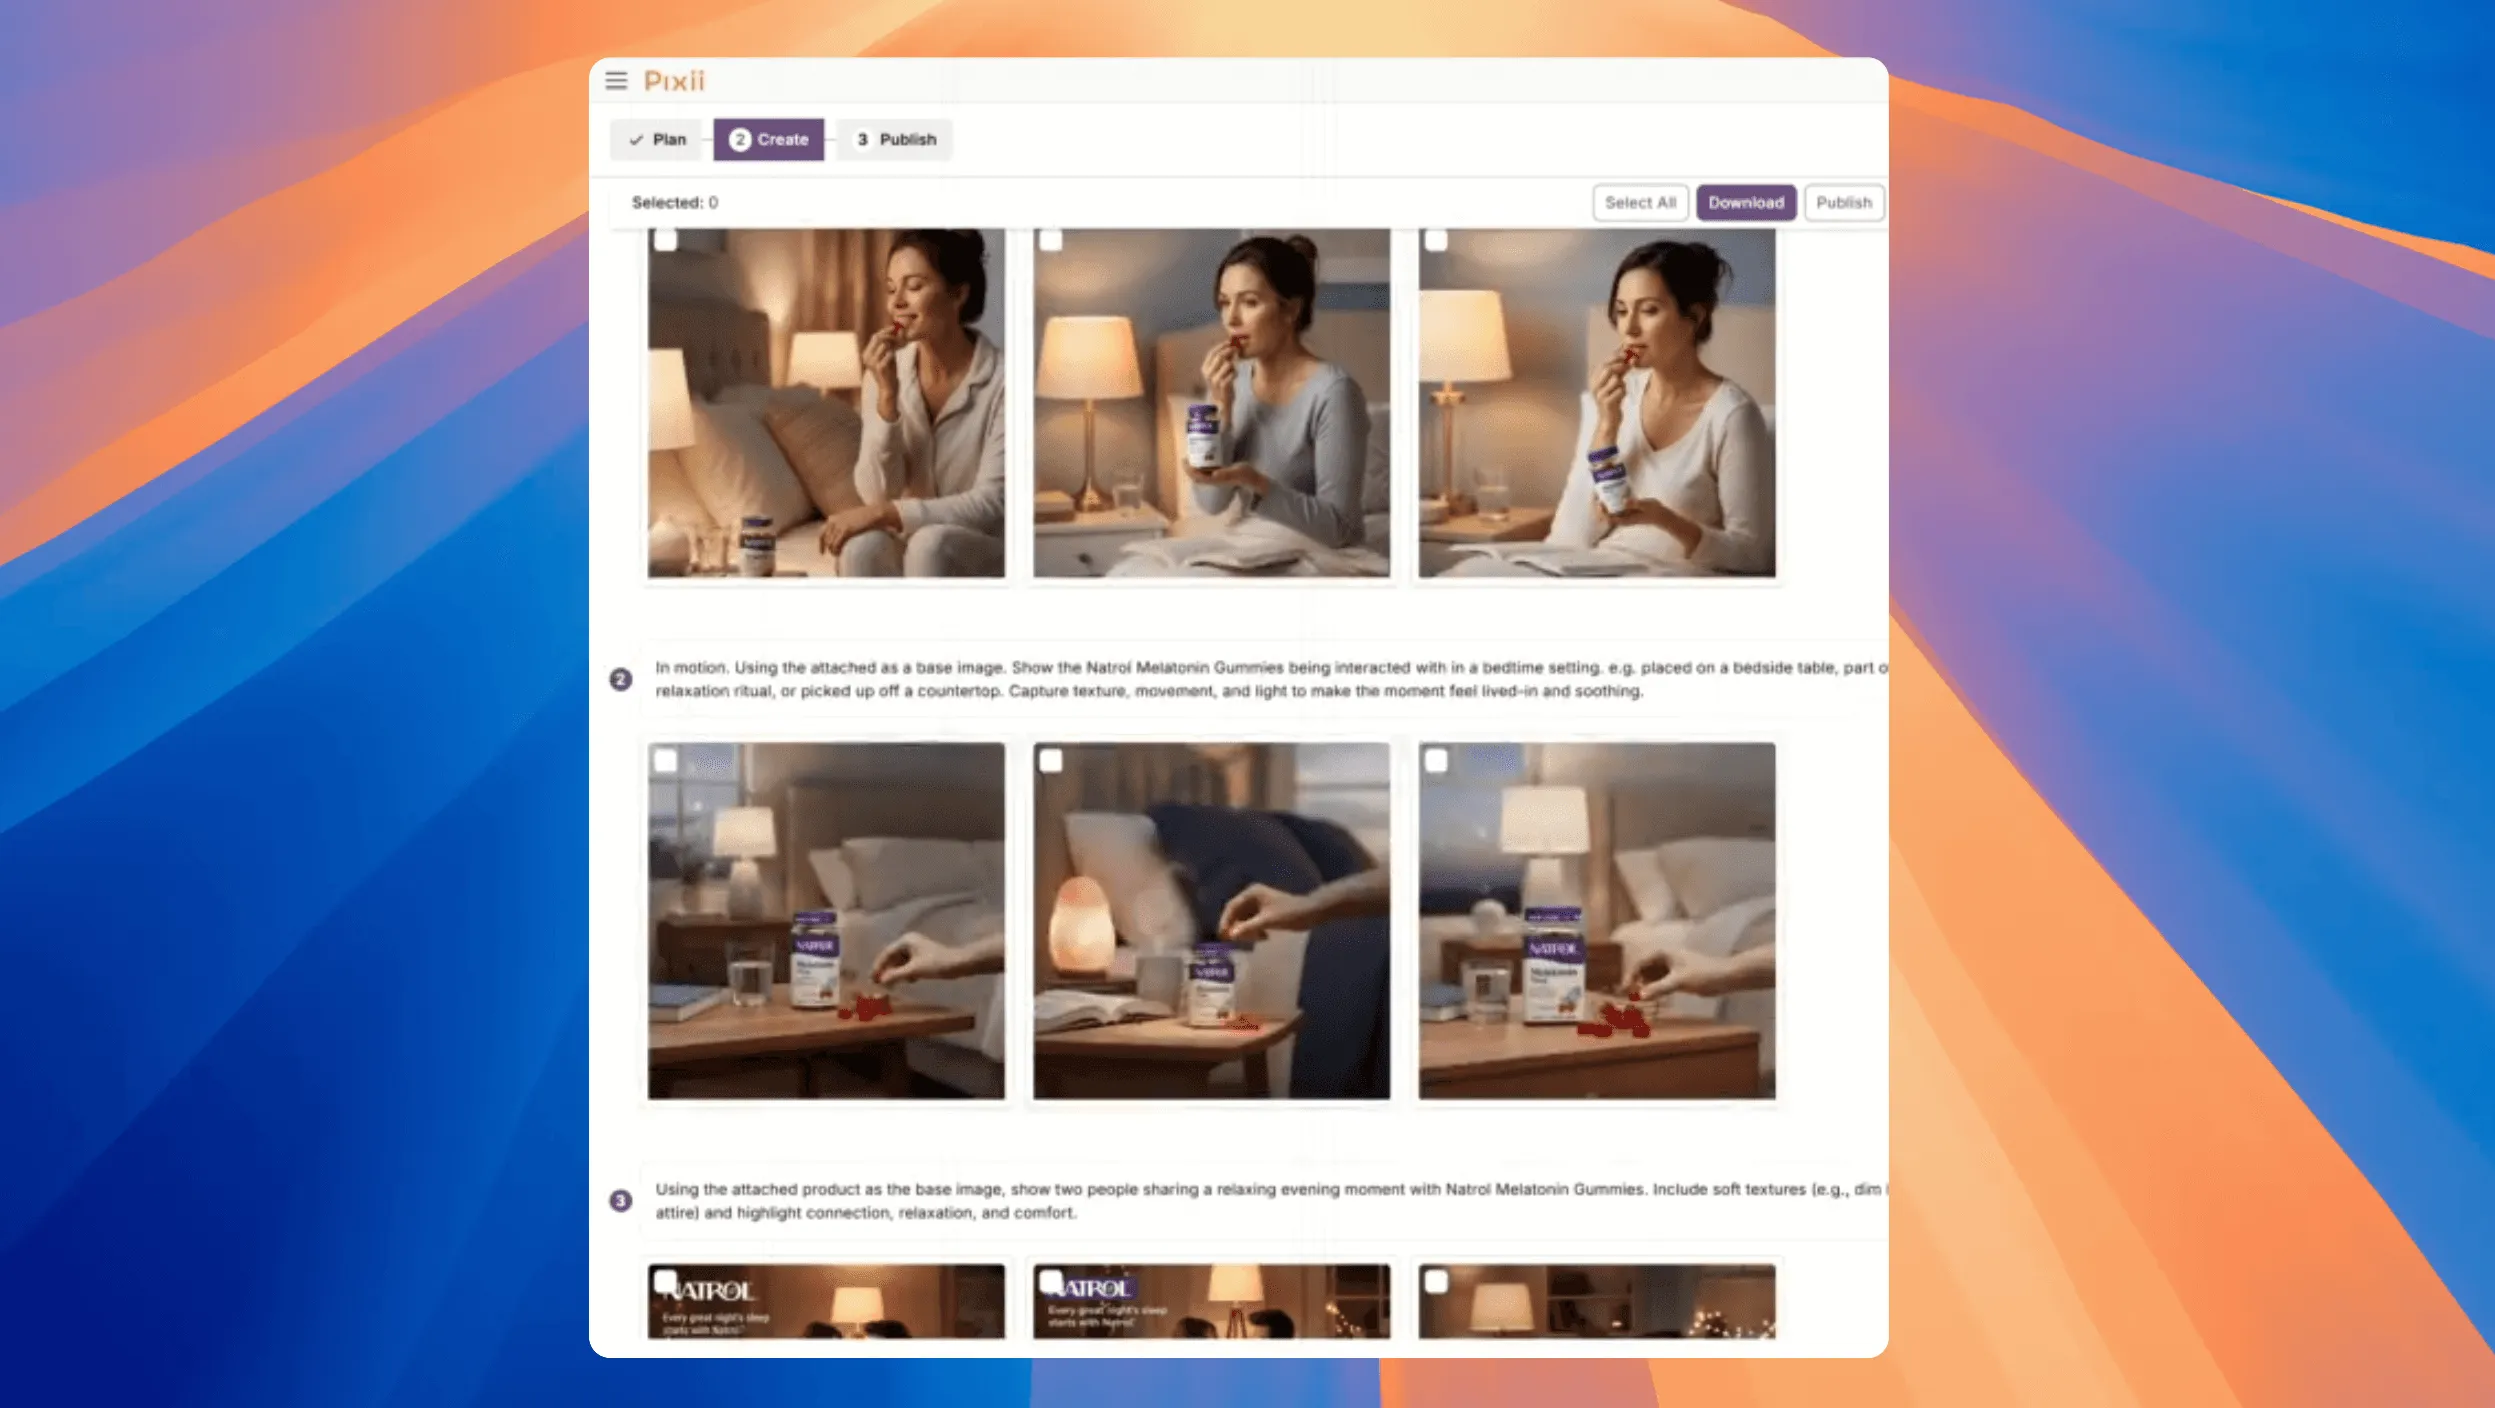
Spending 15 minutes finding or taking a good photo saves you hours of editing later. Take a few good photos. Pixii turns them into lifestyle shots, ads, A+ modules, infographics, everything.
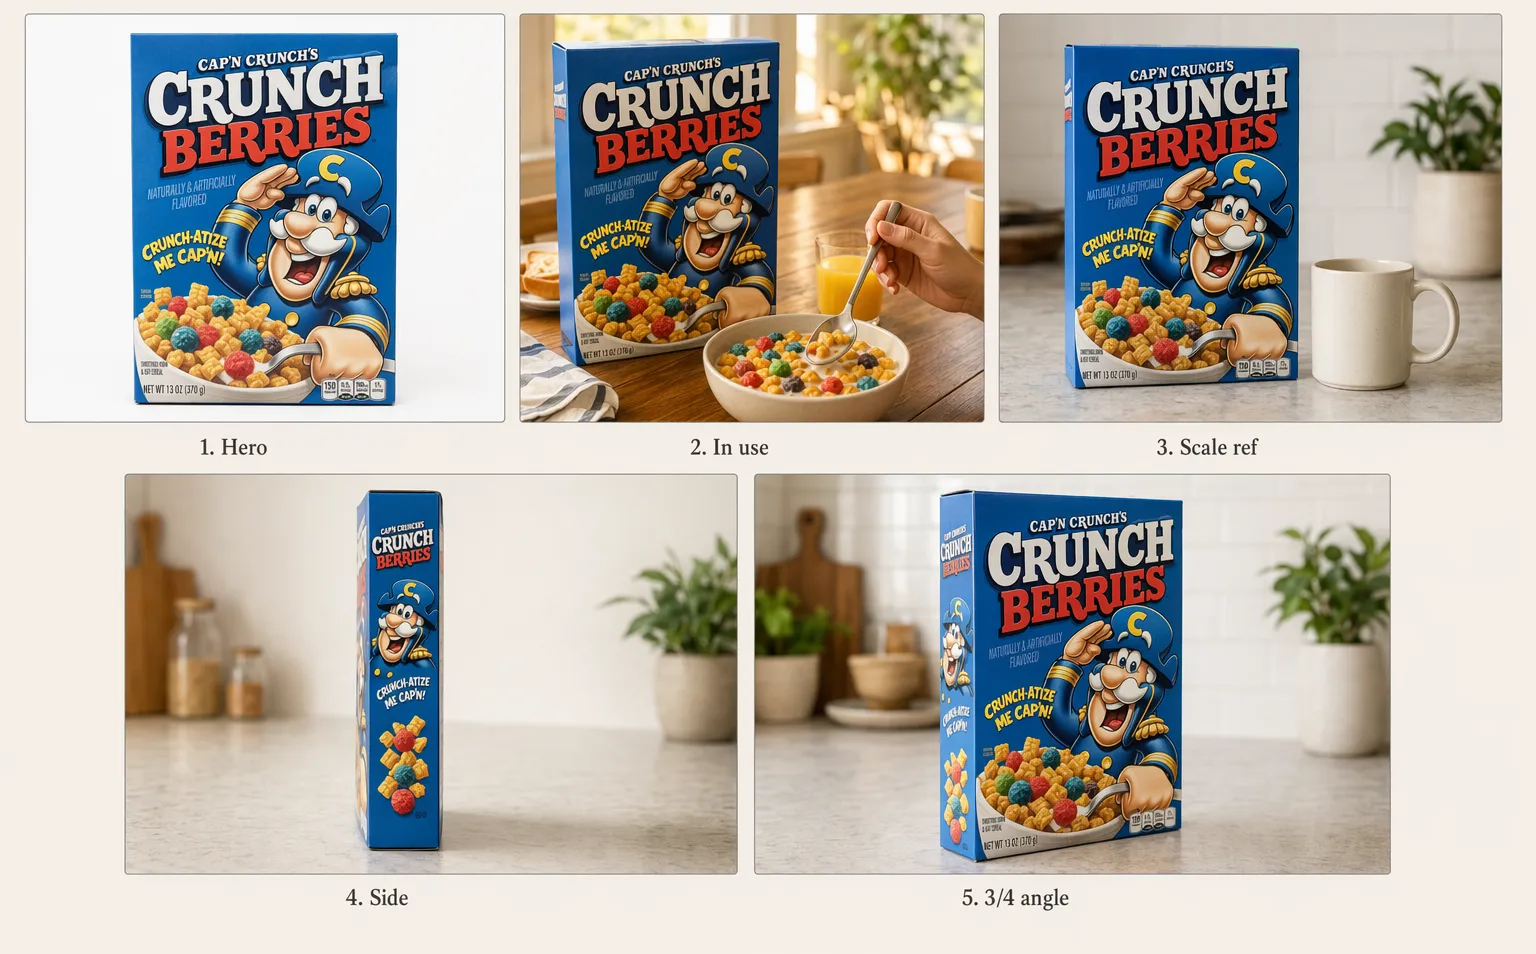
What to shoot: 5 photos minimum
Before you worry about lighting and angles, get the shot list right. Most sellers nail the technique but only take one photo, which is why the AI outputs feel thin. AI needs variety. Here’s what you need at minimum:
- Hero, straight-on, full label visible, eye level. This is your main shot.
- In use, your product being used naturally. Pouring, holding, applying, sitting on a couch, opening the box, whatever fits. This is what unlocks natural lifestyle shots.
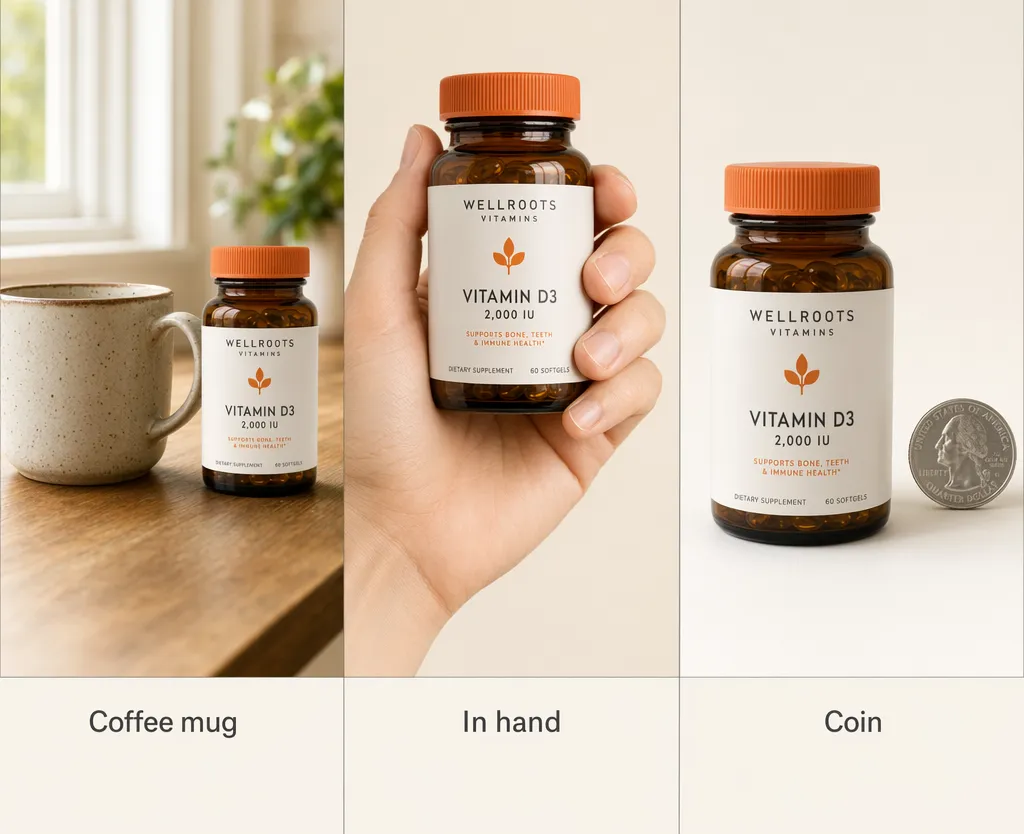
- With a household object for scale, a coffee mug, a hand, a US quarter, a Coke can, an iPhone, a dollar bill. Tells AI how big your product actually is.
- Side, profile view that shows depth and shape. Especially important for boxes, bottles, and packaging with a back side.
- Different angle, rotate the product so a different side of the label is in frame. Gives AI a second view of the artwork.
If you have a product with multiple finishes or colors (hardware, furniture, packaging variants), shoot the shot list once per finish. AI can clone the design across variants once it has clean reference for each.
Cheat sheet
- Use a flat surface
- Shoot in natural light
- Use a 3-second timer
- Get a $9 tripod
- Wipe your lens and your product
- Frame the full product, with margin
- Cover the 5-shot list
- Add a size reference
- Tap to focus, skip the filters
- Upload raw
- Take more shots than you think
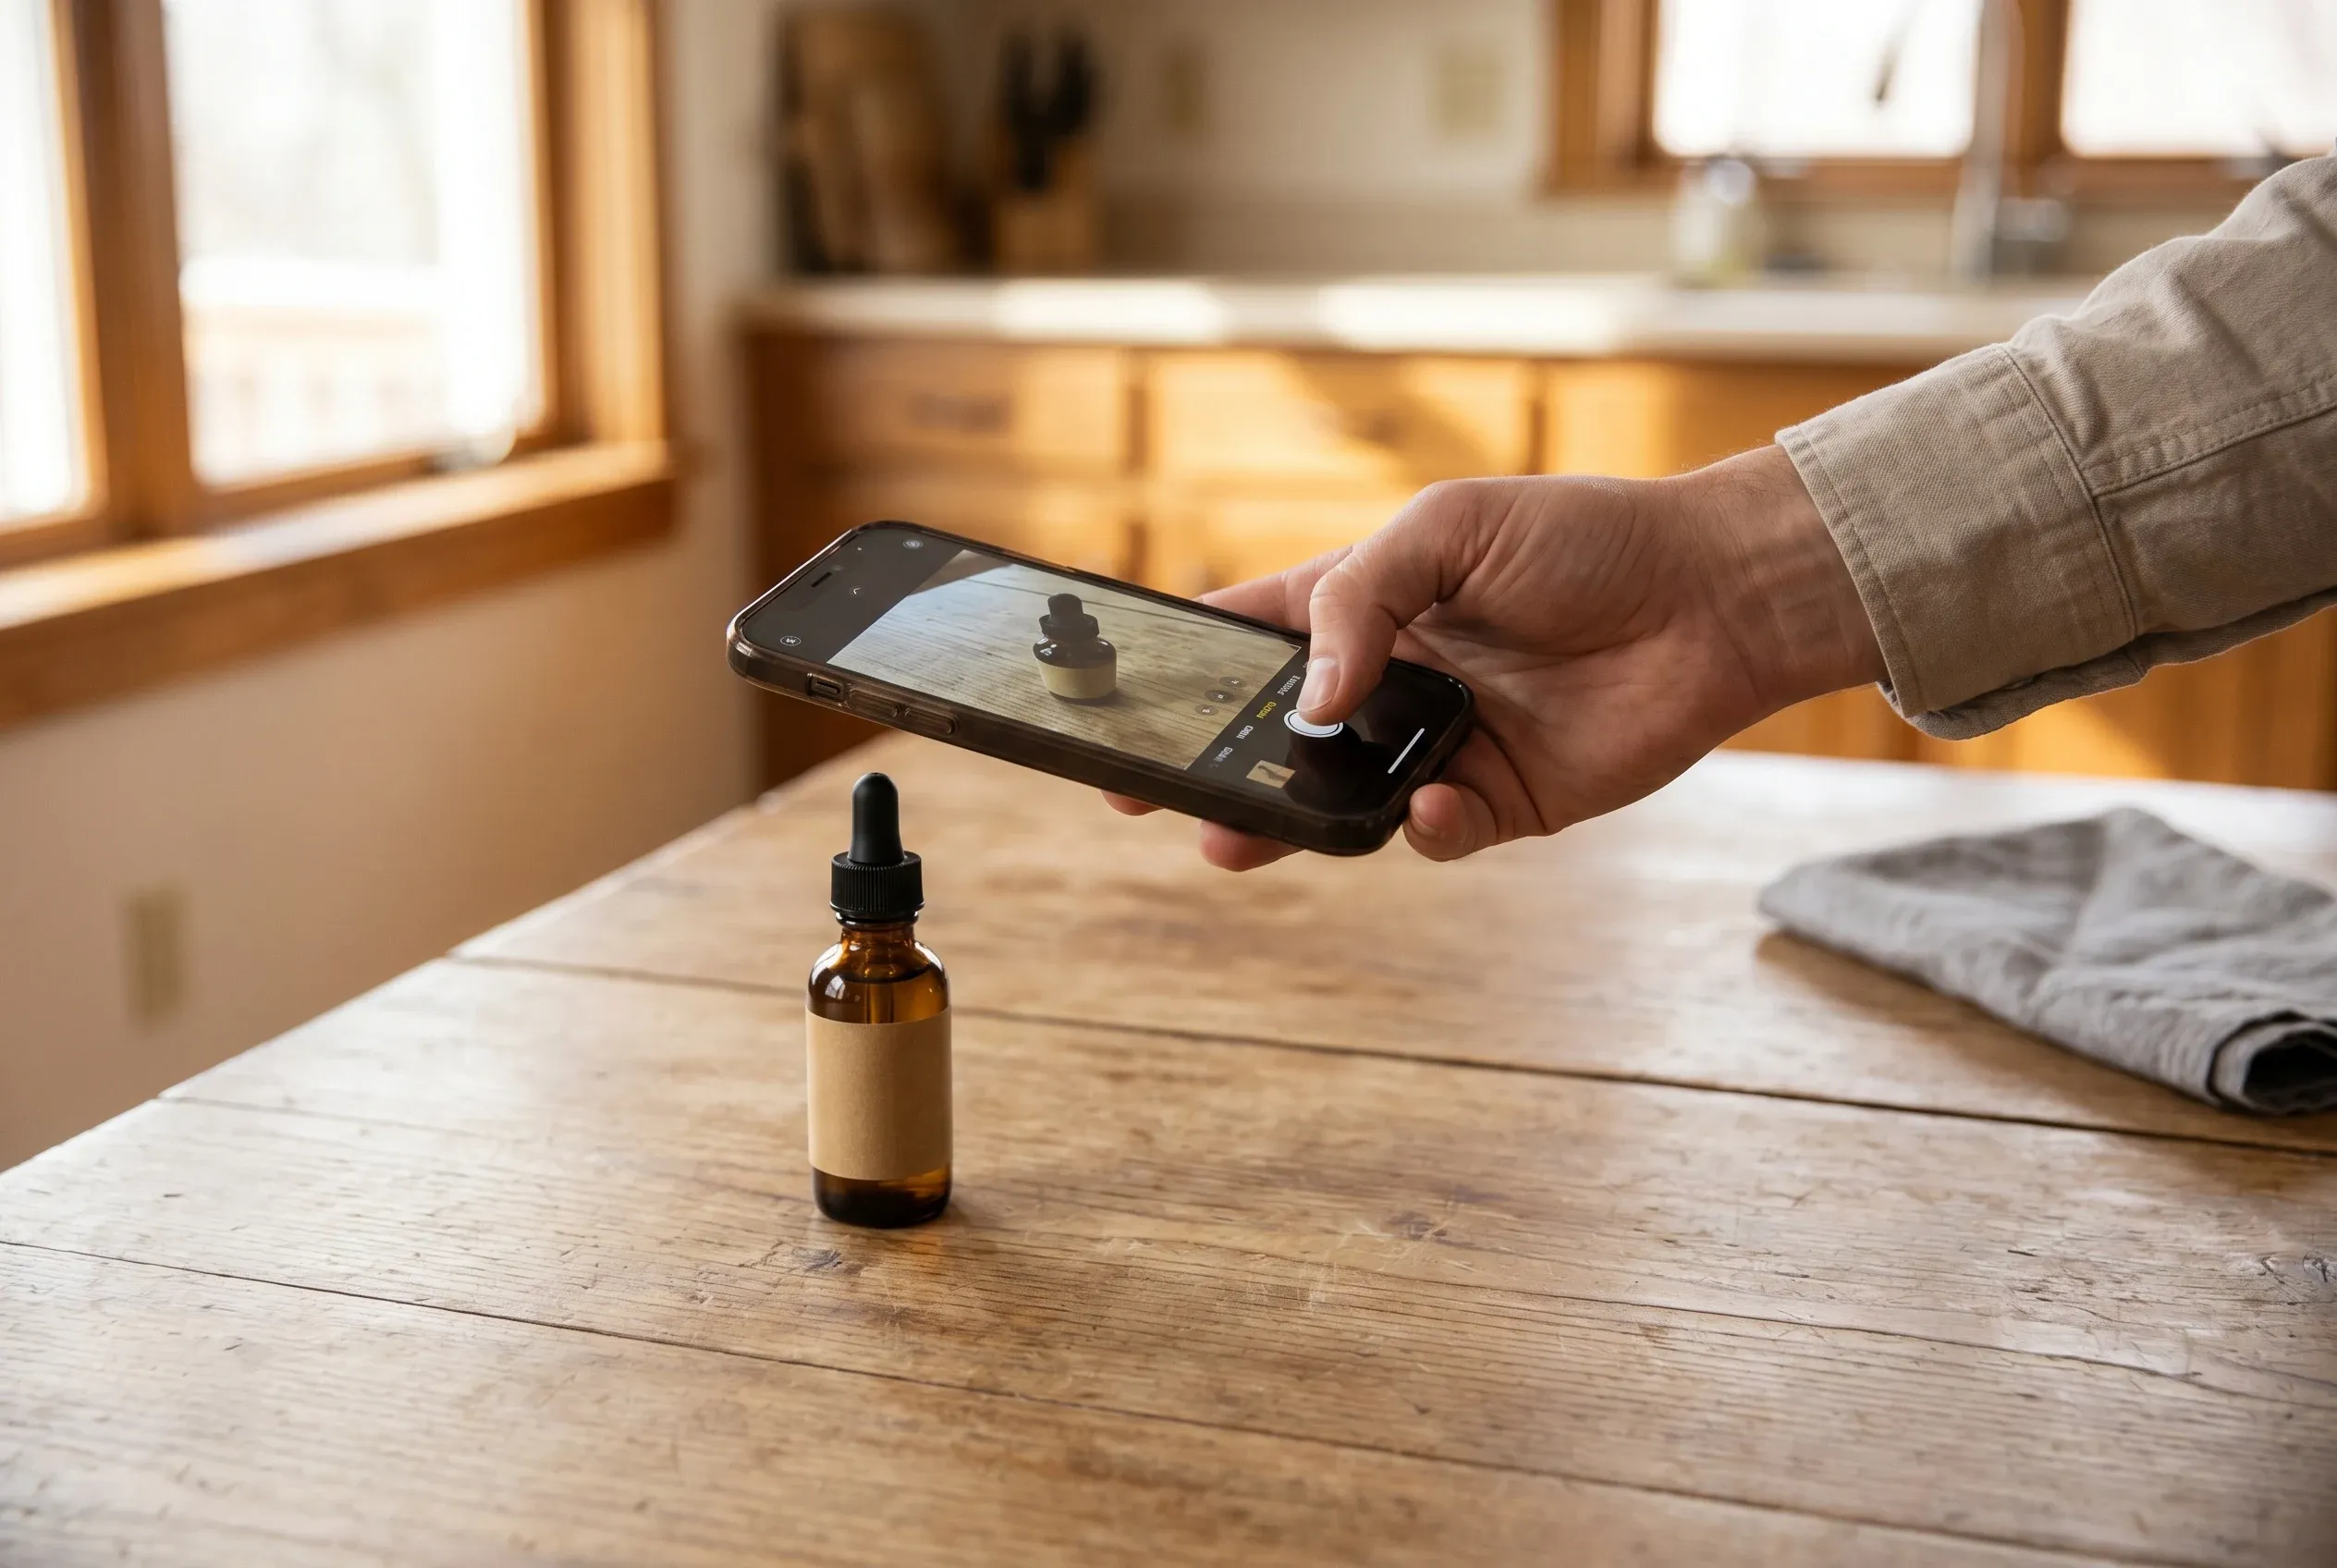
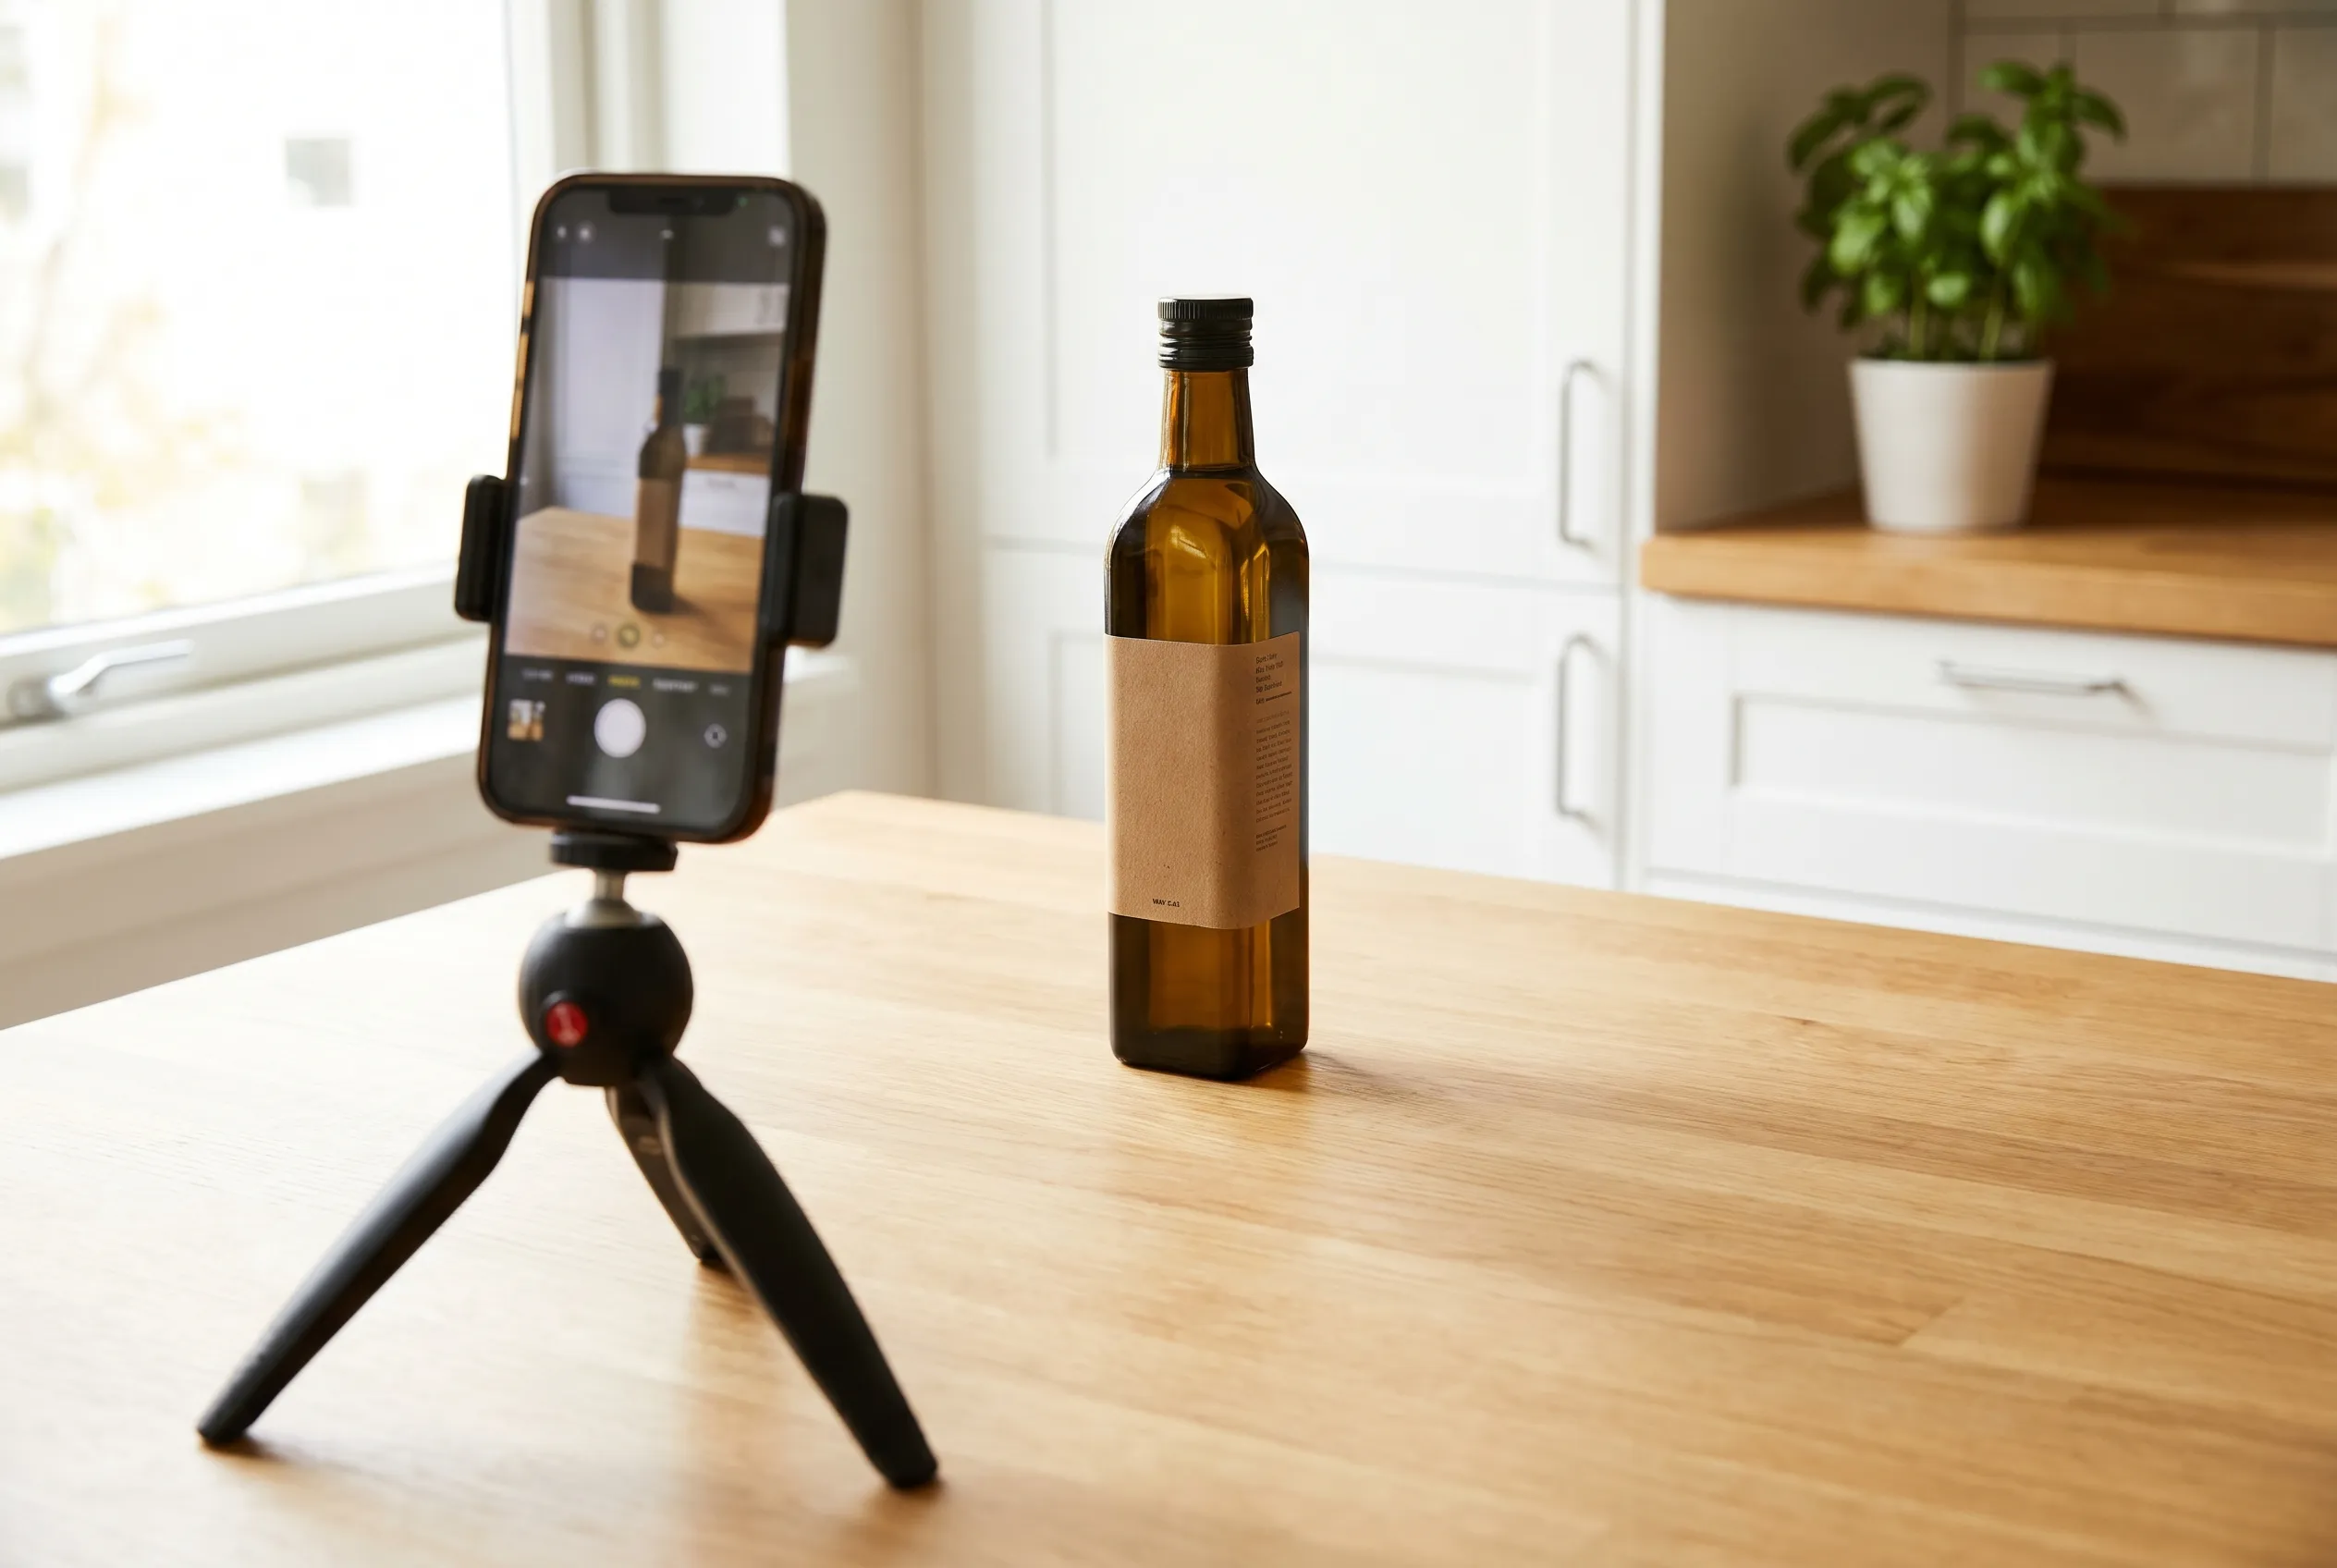
1. Use a flat surface, not a curved backdrop
Find a table, a counter, or a kitchen island near a window. Put the product directly on it. You don’t need a white sheet of paper, a bedsheet, or a foam board underneath, AI does much better with a product sitting on a real surface than a product floating on white. Skip curved seamless backdrops too, they confuse AI and create floating-product artifacts.
2. Shoot near a window with natural light
Soft daylight beats flash, always. North-facing windows are best because the light is even all day. Avoid direct sun, skip overhead lights. Light from the side or at 45 degrees gives you a gentle shadow that helps AI understand depth.

3. Use a 3-second timer
Set the camera timer to 3 seconds, tap shutter, hands off. Even steady hands shake the phone when you tap, and AI sees the soft edges even when you don’t.
4. Get a $9 tripod
A small tabletop tripod from Amazon, or a stack of books. Both work. Locks the phone in one place so your 5 shots are consistent.
5. Wipe your lens and your product
Phone lens, product surface, background clutter. Takes 10 seconds. AI exaggerates smudges and fingerprints.
6. Frame the full product, with margin
Full product in frame, margin on all sides. The most common mistake is cropping too tight and losing part of the label. Frame loose.
7. Cover the 5-shot list
Hero, in use, scale reference, side, different angle. Reference the shot list above.
8. Add a size reference
A coffee mug, your hand, a coin, an iPhone, or a Coke can next to the product. Without one, your 4 oz bottle can end up the size of a building.
9. Tap to focus, skip the filters
Tap the product on screen to lock focus. Adjust exposure up or down if needed. No HDR. No filters.
10. Upload raw
Upload as-is. Minor crop or straightening fine. No filters, no heavy retouching, no color grading.
11. Take more shots than you think
Take 20 to 30 across your angles. Storage is free. Zoom in at 100% and pick the sharpest. Customer review photos in real homes also work well as in-use input.
What about products with multiple finishes or colors?
If you sell hardware, furniture, or packaging in different finishes (brass, bronze, hand-antique, oil-rubbed), shoot the shot list once per finish. A single hero shot per variant is enough, Pixii’s Clone feature propagates the finish across the full set.
What about renders?
Renders work for Amazon main images, that’s why so many brands use them. For lifestyle, A+, and anything that needs to feel real, renders make the output look pasted in.
If renders are all you have, take 5 minutes to shoot one phone photo of the actual product on a counter near a window. Upload both, the render plus the real shot. That alone cuts your editing time by 80%.
If you don’t have the product yet (a new SKU still in manufacturing), use the render for now and swap it in the moment a real sample arrives. Or upload the flat die-line label alongside the render so AI can read the text cleanly.
FAQ
Why does a phone photo beat a render?
A render is perfect. Too perfect. No real shadows, no surface micro-imperfections, no lens artifacts, no dust. AI uses those imperfections to understand the real world, and when they’re missing, it has nothing to anchor to. So the output ends up looking like a render too: shiny, plastic, pasted in.
A real iPhone photo carries 10 MB of natural imperfection data. AI uses every bit of it.
Why does AI need shadows in the input?
Shadows tell AI three things at once: where the light is coming from, how big the product is, and what surface it’s sitting on. Without shadows (background-removed cutouts, render-perfect smoothness), AI can’t place the product in a real-looking room. It ends up looking floating or photoshopped in.
Why a 3-second timer? My phone autofocuses.
Autofocus is sharp. The micro-shake from your finger pressing the shutter is not. It introduces soft edges that you can’t see at thumbnail size but AI absolutely sees. Soft edges are the #1 reason AI outputs come out looking off.
Why do I need multiple angles? Won’t one good hero shot be enough?
One photo is a guess. AI builds a mental model of your product from multiple views, and each extra angle cuts down on the invention. If you only take one shot, AI is guessing on every angle it generates. Five shots, and it can copy real details into every scene.
Why a size reference? Can’t AI tell from the photo?
No. AI sees a bottle on a table. It doesn’t know if the bottle is 2 oz or 32 oz. Add a coffee mug next to it and now AI has scale anchored to a known object. This is the difference between a lifestyle scene where your product looks the right size and one where it looks like a building.
Why is the photo from my Amazon listing not good enough?
Amazon, WhatsApp, and Slack all compress photos. A 10 MB original from your camera becomes a 100 KB thumbnail on Amazon. That’s 1,000x less data for AI. The label gets soft, the edges blur, the colors flatten. You can’t see the difference. AI can.
Always pull the original from your computer or phone, not from Amazon.
Feed these to Pixii. You’ll get lifestyle shots, ads, infographics, A+ modules, and more from the same set of photos.
Want to go deeper?
🔍 How to prevent AI from ruining your product